
Replacement Key

 I want to explain how to use replacement key functionality on AX 2012.

D365FO has the same ability too.

Replacement key helps you to link your parent child tables through the parent table RecId value but on the user interface it will display the string data that makes more sense to the user.

With this ability you don't have to struggle with preparing unique string field to link parent and child table which we all know it could be a nightmare.

Let's start with how can we activate replacement key functionality on AX 2012 

First create the parent table 


Table name is ParentTable and it has two fields Id and Name. Id field is the unique field.
After creating the index change the Allow Duplicates property to No and change the Alternate Key to yes.

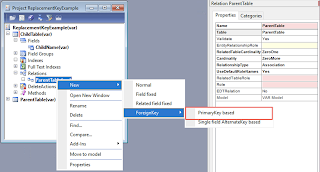
On table properties you should be able to find your index name under ReplacementKey. There can be only one replacement key per table.


Parent table is ready now create the Child table with one field ChildName


When you create a relation on child table with the parent table and select PrimaryKey based option system will create the relation field on child automatically and link to this relation.


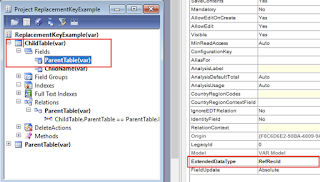
Save your table and create a new form to test. Form has ChildTable as datasource and two fields child name and parentTable fields. If you noticed the parentTable field type is referenceGroup that means it will store the data as RefRecId but will display the id of the parent to the user instead. 


Adding some test data to parent table and opening the child details form 


Lookup has the records to choose but are we need the names too to know which id belongs to which name.
Solution is simple just add the details fields to the AutoLookup field group on the ParentTable.


We have names now to choose the correct parent now.

After user saves the records system fill the reference field.


Hope this helps you to link tables, see you next time!
Alper.


Comments

Popular posts from this blog

D365 F&O Transportation Module (TMS)

      I would like to give some summary information on the TMS module. TMS module helps you manage your both inbound and outbound operations.   You can plan your shipments, routes, loads, appointments and drier check in/outs.  You can see the fastest or less expensive routes as an example with to assign rates and calculate with engines. Also you can manage and reconcile charges. Please find the Microsoft Documentation for the Module below: https://docs.microsoft.com/en-us/dynamics365/supply-chain/transportation/transportation-management-overview Also I like the video series below from Michael Cobbin which give detail for the TM module from Tech Talk: https://www.youtube.com/watch?v=gqGKgiDEQLk https://www.youtube.com/watch?v=gqGKgiDEQLk&list=PLaKeZD0fHWIp8zD088_6svgMZ5v1CmJGz&index=8 https://www.youtube.com/watch?v=9-gGUxeQSAc&t=1408s https://www.youtube.com/watch?v=gqGKgiDEQLk&t=1456s

Vendor Invoice Posting Date (Pending Invoices)

  On the pending invoice posting form, there are different dates that may need to be filled. But there are two fields that may be mixed up. Invoice Date and Posting Date.  -Invoice Date is the date of the real invoice and most of the calculations(cash discount, exchange rates etc.) are using this date. It is optional not to fill this information unless on the parameters it is set to be filled mandatory. (Account payable > Setup > Account payable parameters -> Require document date on vendor invoice) - Posting Date is the date the transaction is posted to GL. This may differ from the invoice date in many circumstances. For example the invoice may arrive to posting user after the invoice date, period is closed etc. This field is used for calculations if invoice date is not filled. To fill the invoice date is mandatory and it is set to today as default when invoice is created but can be changed before posting. In some circumstances, users may need to change or bulk ...

Default Descriptions

  In D365 F&O there are ways to manage the descriptions. You may find the list below: Manual:  You may fill the description in the journals per line before you post the transactions. you may fill both for account and offset account. If you define a description before, you may select one from the list. Automatic:  Some transactions are auto created to the journals or on transactions default from the hard coded codes, like asset lease management and some functionalities in TMS management. Default Descriptions:  You can setup default descriptions by transaction type (sales order invoice, Po invoice, revaluation etc). On the transaction types you can use static (constant) text and/or variables. Specific Cases:  There are specific cases like revaluation. If you define the text during to run in revaluation process, system uses that information instead of to use the definition on the default description. Or if there is no setup on default descriptions, cancel opera...